Java 微信公众号开发
场景 公司需要做一个微信的公众号,以前没有玩过结果踩了一堆坑,也是无奈了,便在这里记录一下
注册微信公众号 首先在 微信公众平台 注册一个账号,这里选择了 _订阅号_,填写一堆乱七八糟的信息后就得到了一个微信公众号(订阅号)了。之后登录的话却是要进行扫码操作(反人类操作)。
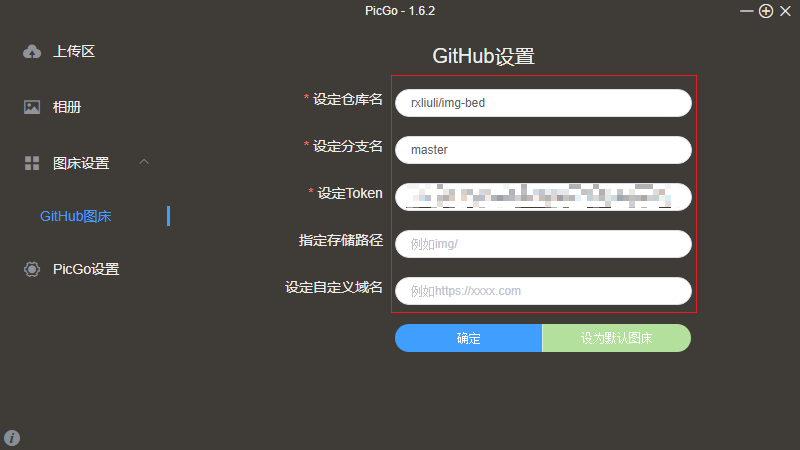
基本配置 在【开发 > 基本配置】中设定好相关的信息,主要有
开发者 ID(AppID):自动生成
开发者密码(AppSecret):修改完之后记录下来,一会还要用到
IP 白名单:可以公网访问的服务器 IP 地址(没有也行,后面会说到 内网穿透 )
服务器地址(URL):用于给微信校验的服务器地址,没有公网服务器也行
令牌(Token):自定义,随机字符串即可,可以在 LastPass 生成一个
消息加解密密钥(EncodingAESKey):点击随机生成即可
消息加解密方式:目前选择明文模式
配置服务器地址时会报错,先不管了就行,后面会再回来配置的。
使用测试账号 有了自己的微信公众号当然很好,但不可能每次都直接修改真正的公众号吧,修改挂了怎么办?所以就有了测试公众号,而且测试公众号的权限是要高于普通的未认证订阅号的。
在【开发 > 公众平台测试帐号 > 公众平台测试帐号】中申请一个测试账号,如 基本配置 所述中配置一下。
安全域名设置:如果你有的自己的域名和服务器的话就配置,否则就先不管。
服务端编码 初始化项目 为了简化配置这里使用 SpringBoot Web 项目作为例子(注意勾上 web 模块依赖)
内网穿透 使用内网穿透工具 serveo 实现将本地内网服务映射到外网的 80 端口上
下面的命令要求系统已经安装了 SSH 客户端,Linux 已经默认安装了,如果是 Windows 可以使用 Cmder 或 Git For Windows 之类的。
1 ssh -o ServerAliveInterval=60 -R rx:80:localhost:8080 serveo.net
具体可以参考 官网 或 使用 Serveo 进行内网穿透
现在,访问 https://rx.serveo.net/ ,是不是已经可以啦(出现的 Whitelabel Error Page 不用管,因为我们本来也没有处理 / 路径的访问)
微信服务器认证 引入额外的依赖(SpringBoot Web 项目默认引入 spring-boot-starter,spring-boot-starter-web 和 spring-boot-starter-test 模块)
1 2 3 4 5 6 <dependency > <groupId > com.github.binarywang</groupId > <artifactId > weixin-java-mp</artifactId > <version > 3.1.0</version > </dependency >
添加配置文件 application.yml
1 2 3 4 5 6 7 8 9 10 11 server: port: 8080 custom: wx: mp: appId: appId secret: secret token: token aesKey: aesKey
将配置读取到 Java Bean 对象上方便在程序中使用 WxMpPropertiesConfig
1 2 3 4 5 6 7 8 9 10 11 12 13 @ConfigurationProperties(prefix = "custom.wx.mp") public class WxMpPropertiesConfig { private String appId; private String secret; private String token; private String aesKey; }
添加微信相关的主配置类 WxMpMainConfig
1 2 3 4 5 6 7 8 9 10 11 12 13 14 15 16 17 18 19 20 21 22 23 24 25 26 27 28 29 30 31 32 33 34 35 36 37 38 39 40 41 42 @Configuration @EnableConfigurationProperties(WxMpPropertiesConfig.class) public class WxMpMainConfig { private final WxMpPropertiesConfig wxMpPropertiesConfig; private WxMpService wxMpService; @Autowired public WxMpMainConfig (WxMpPropertiesConfig wxMpPropertiesConfig) { this .wxMpPropertiesConfig = wxMpPropertiesConfig; } @PostConstruct public void init () { final WxMpInMemoryConfigStorage storage = new WxMpInMemoryConfigStorage (); storage.setAppId(wxMpPropertiesConfig.getAppId()); storage.setSecret(wxMpPropertiesConfig.getSecret()); storage.setAesKey(wxMpPropertiesConfig.getAesKey()); storage.setToken(wxMpPropertiesConfig.getToken()); wxMpService = new WxMpServiceImpl (); wxMpService.setWxMpConfigStorage(storage); } @Bean public WxMpService wxMpService () { return wxMpService; } }
添加一个窗口 api 用于给微信调用 WxMpPortalApi
1 2 3 4 5 6 7 8 9 10 11 12 13 14 15 16 17 18 19 20 21 22 23 24 25 26 27 28 29 30 31 32 33 34 35 36 37 38 39 40 @RestController @RequestMapping("/wx/portal") public class WxMpPortalApi { private final WxMpService wxMpService; @Autowired public WxMpPortalApi (WxMpService wxMpService) { this .wxMpService = wxMpService; } @GetMapping public String authGet ( String signature, String timestamp, String nonce, String echostr ) { if (StringUtils.isAnyEmpty(signature, timestamp, nonce, echostr)) { throw new IllegalArgumentException ("请求非法参数!" ); } if (wxMpService.checkSignature(timestamp, nonce, signature)) { return echostr; } return "非法请求" ; } }
重启项目,将 https://rx.serveo.net/wx/portal 填到服务器配置中的 url 里面,点击 提交 ,应该可以看到 [修改成功] 的提示了。
消息处理 很显然,如果我们只让微信认证我们的服务器的话是做不了什么的,所以我们需要监听并处理用户在微信公众号中的操作并返回结果。
修改微信服务窗口 api WxMpPortalApi,添加对 post 请求的处理
1 2 3 4 5 6 7 8 9 10 11 12 13 14 15 16 17 18 19 20 21 22 23 24 25 26 27 28 29 30 31 32 33 34 35 36 37 38 39 40 41 42 43 44 45 46 47 48 49 50 51 52 53 54 55 56 57 58 59 60 61 62 63 64 65 66 67 68 69 70 71 72 73 74 75 76 @RestController @RequestMapping("/wx/portal") public class WxMpPortalApi { private final Logger log = LoggerFactory.getLogger(getClass()); private final WxMpService wxMpService; private final WxMpMessageRouter router; @Autowired public WxMpPortalApi (WxMpService wxMpService, WxMpMessageRouter router) { this .wxMpService = wxMpService; this .router = router; } @GetMapping public String authGet ( String signature, String timestamp, String nonce, String echostr ) { if (StringUtils.isAnyEmpty(signature, timestamp, nonce, echostr)) { throw new IllegalArgumentException ("请求非法参数!" ); } if (wxMpService.checkSignature(timestamp, nonce, signature)) { return echostr; } return "非法请求" ; } @PostMapping public String authPost ( @RequestBody String requestBody, @RequestParam("signature") String signature, @RequestParam("timestamp") String timestamp, @RequestParam("nonce") String nonce, @RequestParam(name = "encrypt_type", required = false) String encType, @RequestParam(name = "msg_signature", required = false) String msgSignature ) throws JsonProcessingException { if (!wxMpService.checkSignature(timestamp, nonce, signature)) { throw new IllegalArgumentException ("非法请求, 并非微信发来的" ); } WxMpXmlMessage inMessage = null ; if (encType == null ) { inMessage = WxMpXmlMessage.fromXml(requestBody); } else if ("aes" .equals(encType)) { inMessage = WxMpXmlMessage.fromEncryptedXml(requestBody, wxMpService.getWxMpConfigStorage(), timestamp, nonce, msgSignature); } WxMpXmlOutMessage outMessage = router.route(inMessage); log.info("客户端发送的消息: {}" , new ObjectMapper ().writeValueAsString(outMessage)); return outMessage == null ? "" : outMessage.toXml(); } }
添加一个用户消息处理器
1 2 3 4 5 6 7 8 9 10 11 12 13 14 15 16 17 18 19 20 21 22 23 24 25 26 27 28 29 30 31 32 33 34 35 36 37 38 39 40 public abstract class BaseHandler implements WxMpMessageHandler { final Logger log = LoggerFactory.getLogger(getClass()); @Override public WxMpXmlOutMessage handle (WxMpXmlMessage wxMessage, Map<String, Object> context, WxMpService wxMpService, WxSessionManager sessionManager) { return null ; } } @Component public class MsgHandler extends BaseHandler { @Override public WxMpXmlOutMessage handle (WxMpXmlMessage wxMessage, Map<String, Object> context, WxMpService wxMpService, WxSessionManager sessionManager) { log.info("接收到消息: {}" , wxMessage.getMsg()); final String content = "您发送的消息为: " + wxMessage.getContent(); return WxMpXmlOutMessage.TEXT().content(content) .fromUser(wxMessage.getToUser()) .toUser(wxMessage.getFromUser()) .build(); } }
修改微信公众号主要的配置类 WxMpMainConfig,添加路由管理器
1 2 3 4 5 6 7 8 9 10 11 12 13 14 15 16 17 18 19 20 21 22 23 24 25 26 27 28 29 30 31 32 33 34 35 36 37 38 39 40 41 42 43 44 45 46 47 48 49 50 51 52 53 54 55 56 57 58 59 60 61 62 63 64 65 66 67 68 @Configuration @EnableConfigurationProperties(WxMpPropertiesConfig.class) public class WxMpMainConfig { private final WxMpPropertiesConfig wxMpPropertiesConfig; private final MsgHandler msgHandler; private WxMpMessageRouter wxMpMessageRouter; private WxMpService wxMpService; @Autowired public WxMpMainConfig (WxMpPropertiesConfig wxMpPropertiesConfig, MsgHandler msgHandler) { this .wxMpPropertiesConfig = wxMpPropertiesConfig; this .msgHandler = msgHandler; } @PostConstruct public void init () { final WxMpInMemoryConfigStorage storage = new WxMpInMemoryConfigStorage (); storage.setAppId(wxMpPropertiesConfig.getAppId()); storage.setSecret(wxMpPropertiesConfig.getSecret()); storage.setAesKey(wxMpPropertiesConfig.getAesKey()); storage.setToken(wxMpPropertiesConfig.getToken()); wxMpService = new WxMpServiceImpl (); wxMpService.setWxMpConfigStorage(storage); wxMpMessageRouter = this .newRouter(wxMpService); } private WxMpMessageRouter newRouter (WxMpService wxMpService) { WxMpMessageRouter router = new WxMpMessageRouter (wxMpService); router.rule().async(false ).handler(this .msgHandler).end(); return router; } @Bean public WxMpService wxMpService () { return wxMpService; } @Bean public WxMpMessageRouter wxMpMessageRouter () { return wxMpMessageRouter; } }
现在向公众号发送消息,就可以得到回复了(简单的)。还有日志,菜单,关注,取消关注等处理器这里就不赘述了
创建菜单 创建一个简单的公众号菜单 Api 对象
1 2 3 4 5 6 7 8 9 10 11 12 13 14 15 16 17 18 19 20 21 22 23 24 25 26 27 28 29 30 31 @RestController @RequestMapping("/wx/menu/") public class WxMpMenuApi extends WxMpBaseApi { @GetMapping("create") public String createDefault () throws WxErrorException { final WxMenu wxMenu = new WxMenu (); final WxMenuButton buttonLeft = new WxMenuButton (); buttonLeft.setType(WxConsts.MenuButtonType.CLICK); buttonLeft.setName("点击" ); buttonLeft.setKey(IdWorker.getIdStr()); final WxMenuButton buttonRight = new WxMenuButton (); buttonRight.setType(WxConsts.MenuButtonType.VIEW); buttonRight.setName("链接" ); buttonRight.setUrl("https://blog.rxliuli.com" ); buttonRight.setKey(IdWorker.getIdStr()); wxMenu.getButtons().add(buttonLeft); wxMenu.getButtons().add(buttonRight); return wxMpService.getMenuService().menuCreate(wxMenu); } }
访问 https://rx.serveo.net/wx/menu/create 就可以为微信公众号创建一个简单的菜单了。点击左边的“点击”按钮会回复文字说点击了什么,右边的链接则会跳转到一个网页。
其他的功能就放到后面再实现吧,更多公众号开发相关的内容可以参考 微信官方文档 和 微信开发工具包 。当然,所有的示例代码吾辈都已经放到了 GitHub ,却是可以参考一下的呢